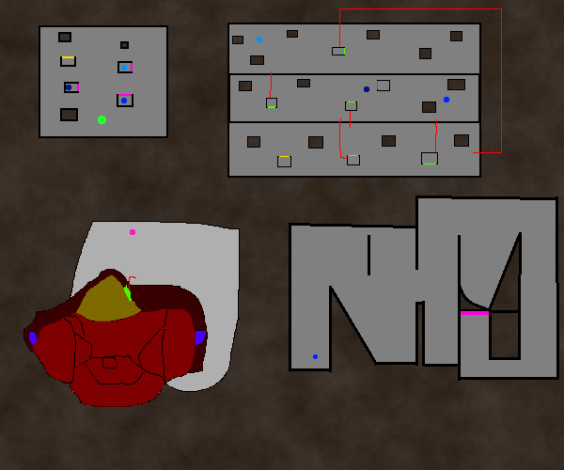
Shrine of Insight Map
From UnderlightWiki
Underlight Era Map
Key:
- Pink lines - Send you to the next room, Rooms shown from left to right, only four of them
- Yellow lines - Send you back a room
- Green lines - Move you to a different place within the room
- Red lines - a guide on where the green lines go.
Different shades of blue dots - Markers of where you will be placed, When inside a box with a purple line on said box, That portal will lead to that dot.
The two purple shapes in the third room - Portals completely out of the maze.
Notes:
- Note 1: This map is a massive pain, Most of it is invisible, However if you look down enough sometimes you can see the floor, Super helpful in the last room
- Note 2: In the third room, there is a good trick for getting into the portal that leads to the last room, First you have to shoot the lightest wall on the right side of the room, when your facing towards it, you have to hit the left corner of that spot, if you are, then back up until you can see the walls going around the edge in a circle at the top, If you can see part of the first wall that goes back into the room, but none of the others, then you are lined up correctly, Head backwards, activating portals as you do so, and you do eventually hit it. If you hit a wall, you missed, Try again
- Note 3:If you stick the wall in the final section, and head backwards and slightly right, Putting yourself back onto the wall when you notice a gap, You should end up going through the portal at the end, This is the only portal in the maze that doesn't need to be activated.
- Note 4: You can activate a portal in the first room twice to skip pass the second room, There is zero timing on this, as one of the portals puts you right next to the portal in room 2 taking you to room 3.
Reference
- Credit given to Explorers Guild - Stellaris, Laieus and Nmoto
- https://forums.underlight.com/viewtopic.php?p=24828#p24828
